Installfest
"Installfest" is my personal setup to install applications that I consider essential for software development.
"Installfest" is my personal setup to install applications that I consider essential for software development.
Xcode is an extensive suite of software development tools and libraries from Apple.
The Xcode Command Line Tools are part of Xcode. Installation of many standard Unix-based tools requires the GCC compiler. The Xcode Command Line Tools include a GCC compiler.
Open the terminal and type
xcode-select --install
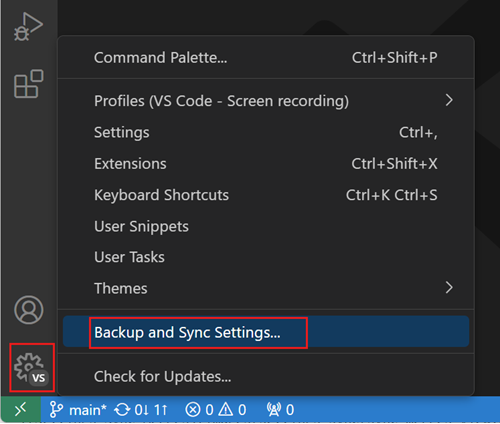
You'll see a panel that asks you to install Xcode Command Line Tools.
Click 'Install' to begin the download and installation process.
Visual Studio Code is a lightweight but powerful source code editor which runs on your desktop and is available for Windows, macOS and Linux. It comes with built-in support for JavaScript, TypeScript and Node.js.
Create a file called one-dark.itermcolors on the ~/Desktop and open it
code ~/Desktop/one-dark.itermcolors
Copy and paste One Dark theme code into the file
Set the theme
Homebrew is a package manager for ~~macOS~~ Linux.
Packages are bundles of source code distributed by developers of software, which can be compiled and installed on your machine.
brew doctorbrew update(Note: the absolute paths will not be used after the next step but might not be needed if they already have /usr/local/bin in their \$PATH)
We will go into more detail about the shell later in the course. Still, a shell is a basic user interface for accessing an operating system's services.
Macs before OSX Catalina were shipped with a 'bash' shell by default. Bash stands for 'Bourne-again shell', referring to its objective as a free replacement for the Bourne shell developed by Steven Bourne.
⚠️ If you are using Catalina or a greater version, skip these inside steps ⚠️
We will use another shell called zsh because it has extra features to make our web development easier.
The American English pronunciation of Z is "zee", so Z shell rhymes with C shell, which sounds like a seashell. zsh was also the login of the original developer Paul Falstad's Yale professor Zhong Shao.
brew install zsh Type 0 if the prompt asks you about .zshrczsh . You should have a different promptexit to return to bashwhich zsh to determine where your new shell has been installedcode /etc/shells and add /YOUR/PATH/TO/zsh. (Lists trusted shells. The chsh command allows users to change their login shell only to shells listed in this file)chsh -s /YOUR/PATH/TO/zsh, then close and reopen your terminal application. This will enable zsh by default.echo $SHELL. This should return /YOUR/PATH/TO/zshOh My Zsh is an open-source, community-driven framework for managing your zsh configuration. Here is the link to the Github.
The PATH environment variable is a colon-delimited list of directories your shell searches through when entering a command.
Type
sh -c "$(curl -fsSL https://raw.githubusercontent.com/ohmyzsh/ohmyzsh/master/tools/install.sh)"
Restart the terminal (close and open)
Add the following to .zshrc file to make VSCode the default text editor:
export EDITOR='code -w -n'
export PAGER='less -f'
Restart the terminal (close and open). The prompt should be a tilde (~), and in colour.
Add the following to .zshrc file to increase ZSH history:
# History
export HISTFILE=~/.zsh_history
## Increase history size
export HISTFILESIZE=1000000000
export HISTSIZE=1000000000
## Immediate append
setopt INC_APPEND_HISTORY
export HISTTIMEFORMAT="[%F %T] "
## Handling duplicate commands
setopt EXTENDED_HISTORY
setopt HIST_FIND_NO_DUPS
setopt HIST_IGNORE_ALL_DUPS
Type
brew install Starship
Add the following to .zshrc to make Starship run on ZSH init
eval "$(starship init zsh)"
To get started configuring Starship, create the following file:~/.config/starship.toml
# Don't print a new line at the start of the prompt
add_newline = false
# Disable the package module, hiding it from the prompt completely
[package]
format = "via [🎁 $version](208 bold) "
[git_branch]
symbol = "🌱 "
[nodejs]
format = "via [🤖 $version](bold green) "
[directory]
truncation_length = 8
truncation_symbol = "…/"
[docker_context]
format = "via [🐋 $context](blue bold)"
[kotlin]
symbol = "🅺 "
[kubernetes]
format = 'on [🐳 ($user on )($cluster in )$context \($namespace\)](dimmed green) '
disabled = false
[rust]
format = "via [⚙️ $version](red bold)"
[sudo]
style = "bold green"
symbol = "👩💻 "
disabled = false
[terraform]
format = "[🏎💨 $workspace]($style) "
A cat clone with syntax highlighting and Git integration.
brew install bat
A Ruby version manager is a programme designed to manage multiple installations of Ruby on the same device.
There are two main Ruby version managers, Rbenv and rvm. Both have advantages and disadvantages. I use rvm
Note: If a student does have rvm installed:
rvm implode
gem uninstall rvm
Install rbenv (the Ruby version manager) and ruby-build (the Ruby version builder) from Homebrew:
brew install ruby-build rbenv
Ensure that rbenv is loaded whenever we open a command line session:
echo 'if which rbenv > /dev/null; then eval "$(rbenv init -)"; fi' >> ~/.zshrc
Move the rbenv environment higher in the load order:
echo 'export PATH=$HOME/.rbenv/shims:$PATH' >> ~/.zshrc
Quit the current terminal (Cmd+Q)
Then reopen the terminal application, ensuring there are no errors - you should be able to type rbenv -v and get a version number.
Ruby-build is a rbenv plugin that provides a rbenv install command to compile and install different versions of Ruby on UNIX-like systems.
rbenv install 2.2.3rbenv rehashrbenv global 2.2.3ruby -vWhenever we install a gem, it also installs a bunch of documentation we probably don't want - the following command allows us to avoid this:
echo 'gem: --no-rdoc --no-ri' >> ~/.gemrc
Bundler manages Ruby gems per-project/application, and makes it trivial to install all the dependencies for an application:
gem install bundler
rbenv rehash
If you install a gem that includes 'binaries' (or any generally available command line scripts), you need to run rbenv rehash so that rbenv can create the necessary shim files, (a shim file ensures there's no threat of incompatibilities between libraries or systems like Bundler and rbenv.)
pyenv lets you easily switch between multiple versions of Python.
brew install pyenv
brew install pyenv-virtualenv
echo 'export PYENV_ROOT="$HOME/.pyenv"' >> ~/.zshrc
echo 'command -v pyenv >/dev/null || export PATH="$PYENV_ROOT/bin:$PATH"' >> ~/.zshrc
echo 'eval "$(pyenv init -)"' >> ~/.zshrc
echo 'eval "$(pyenv virtualenv-init -)"' >> ~/.zshrc
Check the latest python version and replace the semver number
pyenv install 3.11.1
pyenv global 3.11.1
pip install -upgrade pip
Open a terminal window and type:
curl -o- https://raw.githubusercontent.com/nvm-sh/nvm/v0.39.3/install.sh | bash
Type source ~/.nvmrc to include the new folders to the current $PATH
Now that nvm is installed, we want to list the available versions, type:
nvm ls-remote
Install the latest version of node and the current Long term support (LTS)
nvm install node
nvm install --lts
Check that Node is installed, type
node --version
To use nvm use automatically in a directory with a .nvmrc file, add this script to .zshrc
Install pnpm
brew install pnpm
Configure PNPM to work globally
pnpm setup
Create .prettierrc.json file
Let's define some rules for prettier
code ~/.prettierrc
Copy and paste
{
  "trailingComma": "all",
  "tabWidth": 2,
  "semi": true,
  "singleQuote": true,
  "endOfLine": "lf"
}
Save file command + S.
prettier packagesInstall the following prettier packages
pnpm --global add prettier
Just run this
curl --proto '=https' --tlsv1.2 -sSf https://sh.rustup.rs | sh
Git is the version control system that we will use throughout the course. It is one of the most powerful tools you will use as a developer.
brew install git/usr/bin/git by checking which git and git --version git config --global user.name "Your Name"
git config --global user.email "you@example.com"
Instead of having a global user email, we can set a different identity per repo.
Reset global user email
git config --global --unset-all user.email
Set local config per repo
git config --global --add user.useConfigOnly true
Add email to your GitHub account emails
Before the first commit on the repo
git config --local --add user.email mail@example.com
maingit config --global init.defaultBranch main
git show plugin (Delta)Delta provides language syntax highlighting, within-line insertion/deletion detection, and restructured diff output for git on the command line.
Install via brew
brew install git-delta
Configure git to use delta by adding the following to .gitconfig:
 [core]
     pager = delta

 [interactive]
     diffFilter = delta --color-only

 [delta]
     features = side-by-side line-numbers decorations
     whitespace-error-style = 22 reverse

 [delta "decorations"]
     commit-decoration-style = bold yellow box ul
     file-style = bold yellow ul
     file-decoration-style = none
git lb Git alias for recent branches~/.gitconfig[alias]
lb = !git reflog show --pretty=format:'%gs ~ %gd' --date=relative | grep 'checkout:' | grep -oE '[^ ]+ ~ .*' | awk -F~ '!seen[$1]++' | head -n 10 | awk -F' ~ HEAD@{' '{printf(\" \\033[33m%s: \\033[37m %s\\033[0m\\n\", substr($2, 1, length($2)-1), $1)}'
git-clean~/.zshrc# Git Remove tracking branches no longer on remote
# https://stackoverflow.com/a/33548037/4842303
git-clean(){
git fetch -p && for branch in $(git for-each-ref --format '%(refname) %(upstream:track)' refs/heads | awk '$2 == "[gone]" {sub("refs/heads/", "", $1); print $1}'); do git branch -D $branch; done
}
.gitignoreThere are a few files that we don't want Git to track. We can ignore them by adding the files to a global .gitignore file.
.DS_Store files are used by Mac OS X to store folder-specific metadata information. They are different for every Mac, so they often cause conflicts in version-controlled folders.
Since we never want to track. DS_Store files, we can make a global .gitignore file and tell Git to use it for all repositories:
echo .DS_Store >> ~/.gitignore_global
git config --global core.excludesfile ~/.gitignore_global
In the same way, we want to never track the contents of our uploads folder in Rails (which usually contain images or media we uploaded during testing) or our node_modules or bower_components.
echo "/public/uploads/\nnode_modules/\nbower_components/" >> ~/.gitignore_global
Enable auto-correct. The suggested command will run after a short delay to give you a chance to cancel the command if it is not what you intended
git config --global help.autocorrect 20
GitHub is a web-based Git repository hosting service. It allows us to keep a remote version of our version-controlled projects. When we push and pull from Git, we don't want to always have to log in to verify who we are. Therefore, we can generate and use something called an SSH key. SSH keys are a way to identify trusted computers without involving passwords.
ls -al ~/.ssh
ssh-keygen -t rsa -C "your_email@example.com"
ssh-add ~/.ssh/id_rsa
pbcopy < ~/.ssh/id_rsa.pub
key field - do not add or remove characters or whitespace to the keyAdd key and check everything works in the terminal by typing:
ssh -T git@github.com
pbcopy < ~/.ssh/id_rsa.pub
key field - do not add or remove characters or whitespace to the keySigning Key.Add keygit config --global commit.gpgsign true
git config --global gpg.format ssh
git config --global user.signingkey ~/.ssh/id_rsa.pub
During the course, we will do a lot of navigating using our keyboards. By default, the speed of the cursor on a Mac is a little too slow. Let's increase the speed of the cursor by going to:
System Preferences > Keyboard
Move both up to maximum.